Adding products to your WooCommerce store is an important part of managing your online shop. Whether you are selling clothing, electronics, handmade products, services or other items, WooCommerce makes it easy to add and manage your products directly from your WordPress dashboard.
If you are new to WooCommerce, the number of available product settings can initially seem overwhelming. However, once you understand the basic steps, adding a new product is relatively simple.
In this guide, we will walk you through everything you need to know to add a product to your WooCommerce store.
Before You Add a Product
It is a good idea to have all your product information ready before you begin. You may need:
- Product name
- Product description
- Product price
- Product images
- Product category
- SKU or product code
- Stock quantity
- Product weight and dimensions
- Product variations such as size or colour
Having this information ready will make the process quicker and help ensure your product listing is complete.
Step 1: Log In to Your WordPress Dashboard
Start by logging into your website’s WordPress Dashboard. Once you are logged in, you will see the WordPress administration menu on the left-hand side of the screen. From the menu, go to:
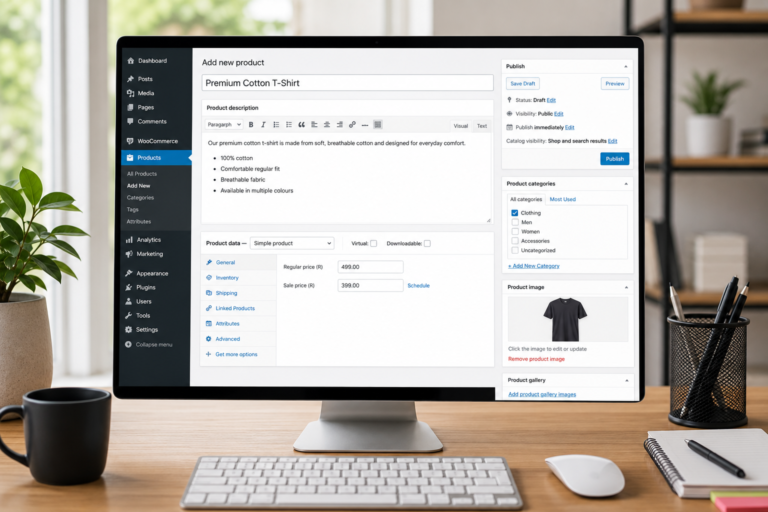
Products → Add New Product
This will open the WooCommerce product editor where you can enter all the information for your new product.
Step 2: Add Your Product Name
At the top of the page, enter the name of your product. For example:
Premium Cotton T-Shirt
Your product name should be clear and descriptive so that customers immediately understand what the product is. Avoid generic names such as: Product 01
Instead, use a name that provides useful information: Men’s Premium Cotton T-Shirt – Black
A clear product name can also make it easier for customers to find your products when searching your website.
Step 3: Add the Product Description
The main content area is where you can add your product description. Your description should explain what the product is and provide customers with the information they need to make a purchasing decision. Consider including:
- Product features
- Benefits
- Materials
- Available sizes
- Available colours
- How the product is used
- Care instructions
- Other important information
For example:
Premium Cotton T-Shirt
Our premium cotton T-shirt is made from soft, breathable cotton and designed for everyday comfort. Its classic fit makes it suitable for casual wear and easy to pair with a variety of outfits.
Features:
- 100% cotton
- Comfortable regular fit
- Breathable fabric
- Available in multiple colours
- Machine washable
Try to write your description for your customer rather than simply listing technical specifications. Explain what makes the product useful and why someone should consider purchasing it.
Step 4: Choose Your Product Type
WooCommerce allows you to create different types of products.
Simple Product
A simple product is a product that does not have different options.
For example: Wooden Coffee Table – R1,500
Variable Product
A variable product has different options that customers can choose from.
For example: T-Shirt
- Small
- Medium
- Large
- XL
It could also have different colours such as black, white and navy.
Virtual Product
A virtual product is not physically delivered to the customer.
For example: Online Consultation
Downloadable Product
A downloadable product is delivered electronically.
For example: PDF eBook
For most physical products, you will usually use the Simple Product option unless the product has different variations.
Step 5: Add Your Product Price
Scroll down to the Product Data section.
Under the General tab, you will find the pricing options.
Enter your: Regular Price
If the product is on sale, you can also enter a: Sale Price
For example:
Regular Price: R499
Sale Price: R399
If your website automatically displays the currency, you generally only need to enter the numerical amount. Always double-check your pricing before publishing a product.
Step 6: Add Inventory Information
If you manage stock through WooCommerce, click the Inventory tab.
You may see options for: SKU
SKU stands for Stock Keeping Unit. This is a product reference number used to identify your products.
For example:
TS-BLK-M
If your business does not use SKUs, this field can normally be left blank.
Stock Quantity
If WooCommerce is managing your inventory, enable Manage Stock and enter the number of products currently available.
For example:
Stock Quantity: 25
WooCommerce can then automatically reduce the stock quantity when customers purchase the product. Keeping your stock information accurate can help prevent customers from ordering products that are no longer available.
Step 7: Select a Product Category
On the right-hand side of the product editor, you will find Product Categories. Select the category that best matches your product.
For example:
Clothing
You can also create a new category if necessary. Other examples could include:
- Men’s Clothing
- Women’s Clothing
- Shoes
- Accessories
- Homeware
- Electronics
Try to keep your categories organised and easy for customers to understand.
Step 8: Add Product Tags
Product tags provide another way to organise and identify your products. For example, a black cotton T-shirt could have tags such as:
- Cotton
- Casual
- Men’s Clothing
- Summer
- Black
Tags are optional, so only use them if they are useful for your store.
Step 9: Add Your Main Product Image
Your product image is one of the most important parts of your product listing. On the right-hand side of the product editor, find Product Image and click:
Set Product Image
You can then upload a new image or select an existing image from your Media Library. Try to use high-quality product images that clearly show the product.
Good product images should ideally have:
- Good lighting
- A clean background
- The entire product visible
- Good resolution
- Consistent styling across your store
Avoid using blurry, stretched or very small images.
Step 10: Add Additional Product Images
WooCommerce also allows you to add additional images through the Product Gallery. You could include:
- Front view
- Back view
- Side view
- Close-up photographs
- Different colours
- Product in use
Multiple images can help customers understand the product better before making a purchase.
Step 11: Add a Short Product Description
WooCommerce provides a separate Product Short Description section. This is usually displayed close to the product image and price.
Keep this description short and focus on the main benefits of the product. For example:
Premium 100% cotton T-shirt designed for everyday comfort. Available in black, white and navy in sizes Small to XL.
Think of the short description as a quick introduction that gives customers the most important information at a glance.
Step 12: Add Shipping Information
If your store uses WooCommerce shipping settings, click the Shipping tab under Product Data. Depending on your website setup, you may need to enter:
- Weight
- Length
- Width
- Height
- Shipping class
For example:
Weight: 0.5 kg
Length: 30 cm
Width: 25 cm
Height: 5 cm
Only enter this information if it is required by your store’s shipping setup.
Step 13: Add Product Variations
If your product is available in different sizes, colours or other options, you can use a Variable Product. For example, a T-shirt could have:
Size:
- Small
- Medium
- Large
- XL
Colour:
- Black
- White
- Navy
To create variations:
- Change the product type to Variable Product.
- Go to Attributes.
- Add your attributes, such as Size and Colour.
- Add the available options.
- Select Used for variations.
- Go to Variations.
- Create or generate your variations.
- Add the price, stock and other information for each variation.
Each variation can have its own settings where required.
Step 14: Check Your Product
Before publishing your product, take a moment to check all the information. Make sure your:
- Product name is correct
- Description is complete
- Price is correct
- Images are correct
- Category is selected
- Stock information is correct
- SKU is correct, if applicable
- Shipping information is correct, if applicable
- Variations are correct, if applicable
A quick check before publishing can prevent mistakes later.
Step 15: Preview Your Product
Before making the product live, click Preview. Look at the product as a customer would see it. Check both the desktop and mobile versions of your product page. Pay particular attention to:
- Product images
- Product name
- Price
- Description
- Product options
- Add to Cart button
- Overall layout
Make sure everything looks professional and is easy to understand.
Step 16: Publish Your Product
Once you are happy with your product, click:
Publish
Your product will now be available on your WooCommerce store. If you are editing an existing product, you will normally see an Update button instead. Click Update to save your changes.
Step 17: Check the Live Product
After publishing, visit your website and open the product page. Check that everything is working correctly. It is a good idea to test:
- Product images
- Product variations
- Add to Cart button
- Quantity selection
- Product price
- Shipping options
- Checkout process
If possible, add the product to your cart and go through the checkout process to make sure everything works as expected.
Tips for Managing Your WooCommerce Products
Use High-Quality Images
Professional-looking product images can make a significant difference to your online store. Try to keep your images consistent in size, background, lighting and style.
Keep Product Information Accurate
Always keep your prices, descriptions, stock levels, variations and shipping information up to date.
Keep Your Store Organised
Use clear product categories and avoid creating unnecessary categories or tags. A well-organised store makes it easier for customers to find the products they are looking for.
Keep Your Stock Updated
If you use WooCommerce to manage your inventory, make sure stock quantities are accurate. This helps prevent customers from purchasing products that are no longer available.
Use Product Variations Where Appropriate
If one product is available in multiple sizes or colours, consider using a Variable Product rather than creating a separate product for every option.
Final Product Checklist
Before publishing a new product, make sure you have completed the following:
- Product name
- Product description
- Product price
- Product category
- Product image
- Additional product images
- Stock information
- SKU, if applicable
- Shipping information, if applicable
- Product variations, if applicable
- Short description
- Product preview
- Final check on desktop and mobile
Ready to Add Your Products?
Adding products to WooCommerce becomes much easier once you understand the basic process. By taking the time to add accurate information, high-quality images, appropriate categories and correct pricing, you can create professional product pages that provide your customers with the information they need.
If you are unsure about changing WooCommerce, WordPress, theme or plugin settings, it is best to contact your website administrator or web designer before making changes. Incorrect settings can affect the way your online store works. Need help managing your WooCommerce website? Contact Webling Web Design for professional website support and maintenance.